Wednesday, February 29, 2012

DIY Thread Organizer


If you embroider or even sew alot you know how annoying it is to have thread in containers or drawers and never know exactly what you have. I always seem to buy the same colors over and over because I forget what I have got and don't go digging to see. My mother in law bought several of the thread organizers from JoAnn Fabrics and hung them on her wall and it gave me an idea. Thread organizers run from $50-$70 dollars and they hold about 60 spools. I have more than 60 spools and I wasn't about to pay $140.00 to organize my thread. So I decided to make my own.


 Inspiration


I took a left over piece of peg board, some thin wood strips and some bamboo kabob sticks and Voila a thread organizer for less than $15.00.

Here's how it worked out


I attached the thin boards behind the peg board and then secured it to the wall. 


Then I cut the bamboo kabob sticks down the the proper length and hot glued them into the peg holes.  You need to space your sticks out so that each spool has room.  I used a pattern of every other hole and every other line.  I tried to illustrate it in the above photo. 


 Now I can see all my colors and won't end up buying the same colors for each project! 


 Peg board 4x8 sheet $8.00
Wood 24" by 1/2" thick $1.37
Kabob Sticks $4.00 a package.

Total for project $13.37.  I am LOVING that! 

Monday, February 27, 2012

Recycling Winter to Summer!

I have 2 little girls and dressing them appropriately has been an adventure the last year.  My 7 year old is a size 8-10 and everything in the stores has something written on it that I do not feel is appropriate.  You know the "hottie" or "Rock-n-Roll" or the ever popular skull and cross bones.  I just don't want my 1st grader sporting around a "I'm a Hottie" t-shirt at the park!  :D.  Fortunately, good ole walmart has plain colored knit shirts.  The problem is they are PLAIN!  I ran across a seasonal sale table last week with a bunch of long sleeve knit shirts for only $3 each.  I decided to up cycle them into some cute summer shirts.  Knit is pretty darn easy to play with, so here is what I did to the first one. 


I cut the sleeves and bottom off and added lettuce leaf trim using a satin stitch and stretching the fabric as I sewed it. 
Even this is a nice play shirt just for summer, you could get by with leaving it like this really. 
But, I didn't.  I cut the collar out and added elastic, giving the shirt a new look all together. 


I added a little crocheted embellishment and Voila! 

Friday, February 24, 2012

Getting Ready for Spring

It's that time of year again, when I get that itch for the cold to GO AWAY and the heat to Bring It!  I LOVE spending time outside in my yard.  We plant some herbs and few vegetables every year and this year is no different.  My girls and I have already started my seedlings in my kitchen window and the last 2 days I cleaned up my deck area and cleaned out my old flower pots for new plantings!  I found these really cool PLASTIC Adirondack style chairs at Lowe's.  I love anything plastic.  It cleans up well.  Kids and animals in my life force me to LOVE anything that cleans up easy!  Anyway, these chairs have inspired my garden theme this year.  It's a kids theme because my kids LOVE to garden with me and I love anything the make and help me do.  We are going eclectic with primary colors.  We are recycling/up cycling, redecorating, repainting, and reusing everything in our garden this year.  You have to let me know what you think so far.  Here are a few pics of what we have done so far. 

 These are our inspiration


 We painted some of our rocks the primary colors.  And buried some of our pots and cleaned them out. 


 I picked up some tires off Craig's list for free and we are painting them to use as planters for our wild flowers. 


 My little ones painting away on those rocks! 


 These are some old hanging yard art that was given to me a few years back by my mother in law.  We spruced it up to go with our theme. 


We still have a lot to do, but we made a dent!  And so far, I am loving it! 


Saturday, February 18, 2012

Ridges n Stripes Throw Pillow

I wanted to add a little color to my comfy yet bland sectional, so I grabbed some yarn from my stash and started making throw pillows.  This is the EASIEST pattern you will ever make. 

The entire piece is worked in the back loops.  I used an I hood and red heart yarn. 

Chain 51

Row 1

Work hdc in second ch from hook and across ( 50 hdc)  ch 1 turn

Row 2-64
Work hdc in each hdc across, ch 1 turn.  ( remember back loops only) 

Finish off , fold in half ( at the 32 row mark) and hand stitch the sides together and half way across the bottom.  Stuff with filling, finish stitching up bottom.  Done! 

Uses as many or as few colors as you like to match your decor. 

Thursday, February 16, 2012

Tinkerbell Room

Well, it got an itch to go ahead and start Hannah's Tinkerbell themed room.  SO I went and bought paint yesterday and I am proud to say that I am more than 3/4 of the way done with her room.  Of course I painted the walls first.  They were an ugly gray when we bought the house last year but now they are the perfect shade of Tinkerbell green.  I added wall stickers and crafted a bed canopy today.  I still need to get the bedding out, sew some curtains, and add some finishing touches but all in all I am really happy with my progress. 

I also made a little holder for her books out or wire hangers, but I haven't decided if I like that or not yet.  So we will see if it stays. 


The bed canopy was kinda a pain because I knew how I wanted it to look but I wasn't sure how I was going to get there.  In the end I am happy with it and so is she.  ( Which is the most important part!) 

I used the dome top of an old bird cage and I attached it to the wall with mirror hangers.  You know the little plastic ones that have a ridge to hold frame less mirrors? 

I tied purple tulle to the sides and back of the frame and them I took some satin and stitched out some leaves.  ( suppose to look like Tinkerbell;s dress bottom). 


mess


Let me just tell ya, this satin is some fraying stuff to work with and it LOVES to move.  I used straight pins and bobby pins to keep it in place.  I also used a satin stitch to form the leaves. 


So this is what I have done so far.  What do you think??  Does the bed look like a Tinkerbell bed or am I just bias?? 


By the way, I bought everything for this room except the paint online.  I love online shopping.  :D 


Free Shipping on orders $35+

Tuesday, February 14, 2012

Kohl's, Craigslist, and Amazon= $30.00

I am always looking for ways to make my house decor look GORGEOUS on the budget of a pauper.  It takes me a long time sometimes to get it just right.  I finally finished the back wall behind my sofa in my family room. 

I purchased the 3 "Texas Rangers" prints in barn wood frames on craigslist for $5.00 each. 


I purchased the candles and wall sconces from Kohl's during a HUGE home sale.  I paid $3.00 for each candle and sconce. 


I found the vinyl quote at Amazon.com for $6.00 plus shipping


Total for my wall, $30.00. 

I am super happy with it.  What do you think????


Saturday, February 11, 2012

Just For Fun, Tea Light Candle Holder!

I found this craft project in pinterest and decided I liked it!  So I made one or two for myself.  Whatcha think? 

It's a recycled and washed tuna can, covered in clothes pins.  Kinda cool huh? 

I was thinking this would be a great outdoor candle for my deck! 


You can see the original post and tutorial HERE.  

HATE THOSE UGLY CONTAINERS!

My husband came home with 4 of the most beautiful Flamingo Flower plants from his office last week. I guess they get rid of them monthly and my hubby ( being totally aware of what a recycle and frugal nut I am) correctly grabbed them up and brought them home for me. Thanks Honey! Not to look a gift horse in the mouth, but I hated the plastic white containers they came in. I guess they weren't giving away the pretty ceramic pots they had them in! Anyway, since they were free, I wanted to keep them as free as possible and I didn't want to go buy 4 expensive pretty pots. So I put my thinking cap on and decided to Modge Podge the white plastic one with brown paper.

Here's what happened! It was easy peasy! 

Before and After! 


First I tore and modge podged the brown paper around the containers. 


Then I stained the paper with a tea bag and covered the entire area with another coat of modge podge. 


I them added some floral moss and tied a thin piece of hemp string around the top of the pot.  I guess I did that for good measure, because it really doesn't add anything to the over all look! 

DONE!  No more ugly white plastic pot!  And it didn't cost me a penny.  Gotta LOVE FREE! 


Saturday, February 4, 2012

For Ya'll's Hair

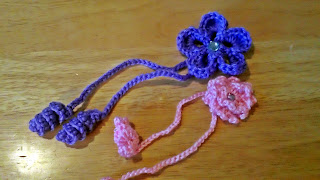
I spent my Saturday afternoon crocheting different patterns I found across the web.
Hair accessories was the goal.

Here are the links to the patterns I used.


( English is all the way down to the bottom of the pattern)


Then I played around a little with the patterns and combined the spiral ties and flowers to make my own floral ponytail ties. I liked each of the patterns alot. They stitched out well.


I also made some little hair bows.  Messing around with some yarn one night I accidentally made a bow with some scrap yarn. And Tada! Almost free hair bows. So I went to Sally's and bought a package of 24 barrettes for 3 dollars ( you could use bobby pins too but the barrettes work better in the hair) and I made some bows.


I used a G hook.

Chain 15 turn
hdc in 2nd chain from hook and across (14 hdc)
Row 2-8 hdc in each hdc, ch 1 turn.
sc in each hdc across, do not chain or turn, continue to sc around the perimeter of the bow ( make sure you do 2 sc in each corner stitch.
Finish off

Cut a piece of yarn long enough to wrap around the center of the bow enough times to make the center knot. I did some fat and some thin.
Tie off center, weave in ends.
Insert barrette or bobby pin into back of center knot and your done.

For a little variety I crocheted one in back loops only and it gives it a ribbed look. You could also add a little button to the center knot or a jewel, etc. Fun Fun!